India eVisa Guide: How to Apply for an India Tourist Visa Online
This post contains affiliate links. If you book through one of my links, I may earn a small commission at no extra cost to you. Thank you for supporting Evie Travels!
If you’re planning your first trip to India, getting your visa is one of those things you probably don’t want to leave until the last minute.
The good news? For most travelers, you can apply for an Indian eVisa completely online without visiting an embassy.
The less good news? The website can test your patience.
I’m not exaggerating when I say that while applying for my own Indian eVisa, the website crashed, froze or simply stopped responding what felt like approximately 150 times. 😂 I genuinely started wondering whether I would reach the payment page before giving up.
So, to save you some frustration, I’m walking you through the entire process in this India eVisa guide, including what you need before you start, what the application asks for, what to watch out for and what I wish I had known beforehand.
Important: Visa rules, fees and eligibility can change. Always check the official Government of India eVisa website before submitting your application. The official portal is Indian Visa Online. The Indian government specifically warns travelers against unofficial visa websites and intermediaries.
Planning your India trip?
🏨 Where to stay: Delhi · Jaipur · Agra · Kerala · Goa
🎟️ Top experiences: Golden Triangle · Kerala · Goa
📱 Stay connected: Get your Saily eSIM here & Save $5 with code EVIE5
🛡️ Travel insurance: protect your trip with SafetyWing
Do You Need a Visa for India?
For most foreign travelers, yes.
If you are traveling to India for tourism, sightseeing or visiting friends and family, the e-Tourist Visa is generally the option you will want to look at.
Citizens of many countries are eligible, including the Czech Republic, the United States, the United Kingdom, Australia and many European countries. However, eligibility depends on your nationality and passport, so check the current official list before applying.
India currently offers different tourist eVisa options, including:
- 30-day e-Tourist Visa
- 1-year e-Tourist Visa
- 5-year e-Tourist Visa
The number of entries and maximum permitted stay depends on the type of visa you choose. The official rules state that 1-year and 5-year tourist eVisas allow multiple entries, while the maximum stay in India during a calendar year is subject to the applicable rules.
Always check the current conditions for your nationality before booking your trip.
India eVisa Guide: What You Need Before You Apply
Before you start your India eVisa application, have everything ready:
- Valid passport
- Digital passport-style photograph (recent photo with light or white background in JPEG format)
- Scanned passport bio page (in PDF)
- Travel and accommodation details
- Employment and family information
- Contact details and previous travel information, if requested
- Details about your hotel in India
Tip: Prepare all your files before starting the application. It will save you a lot of frustration later.
India eVisa Guide: How to Apply for an India Tourist Visa Online Step-by-Step
This India eVisa guide walks you through the application step by step, from starting the form to checking your visa status.
The entire India eVisa application is completed online through the official Government of India portal.
Official India eVisa application portal
I recommend using the official website rather than a third-party visa service as they tend to charge significantly more money. The application is quite long, but once you know what to expect, it’s much easier to get through.
And one warning from personal experience: the website can be painfully slow and unstable. During my own application, it crashed or stopped responding so many times that I genuinely lost count. 😂
Step 1: Start a New Application
Go to the official Indian Visa Online website and select the eVisa option at the bottom of the page.
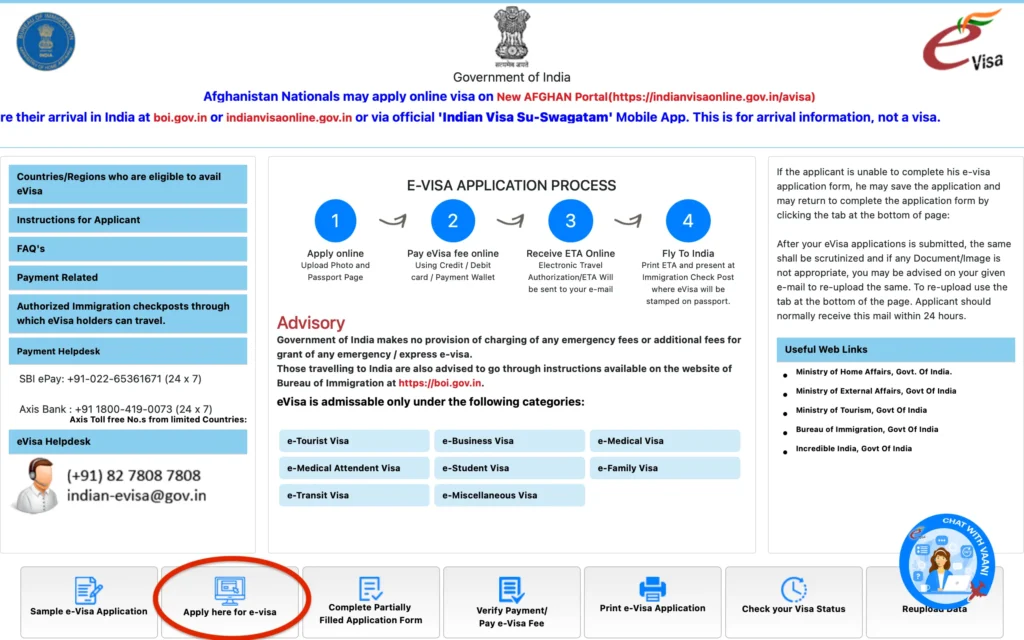
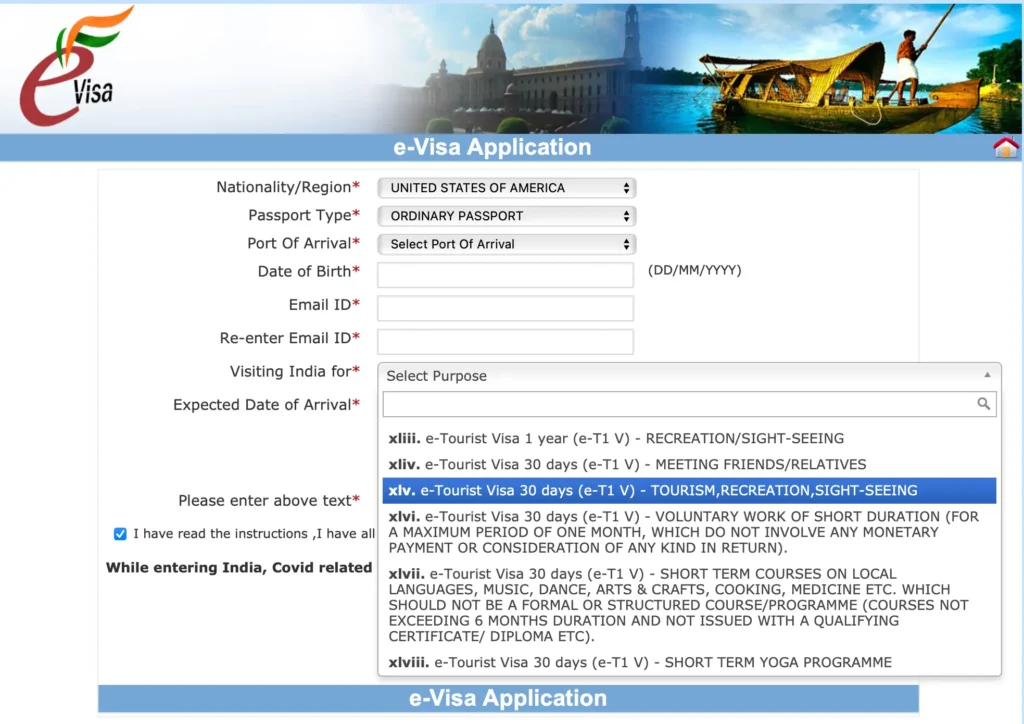
You will start a new application and select your nationality, passport type, port of arrival, date of birth, e-mail address and expected date of arrival. Select the visa type based on the length and purpose of your visit.
Step 2: Enter Your Personal and Passport Details
The first main page asks for your personal and passport information.
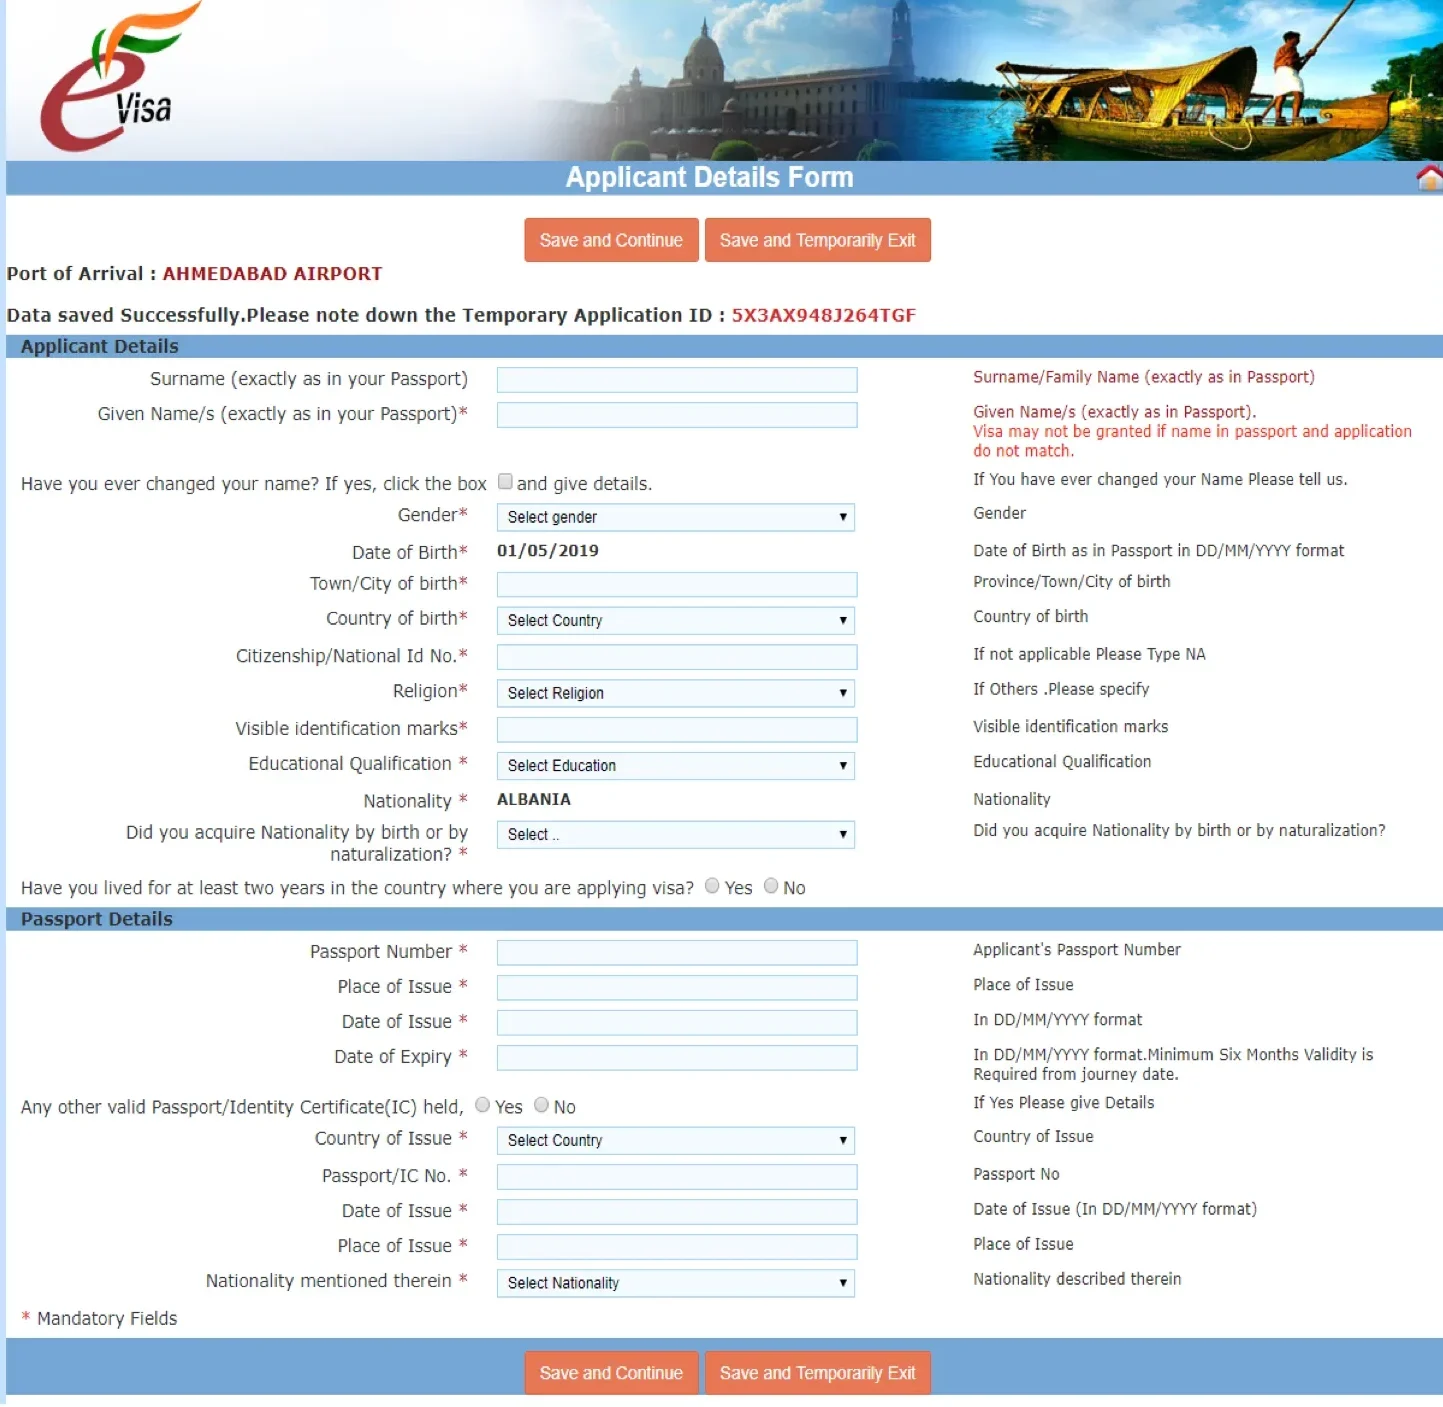
The important thing here is to enter everything exactly as it appears in your passport. Double-check your name, passport number and dates before moving on.
Step 3: Applicant Address & Parents’ Details
This page asks for your current address and your parents’ details.
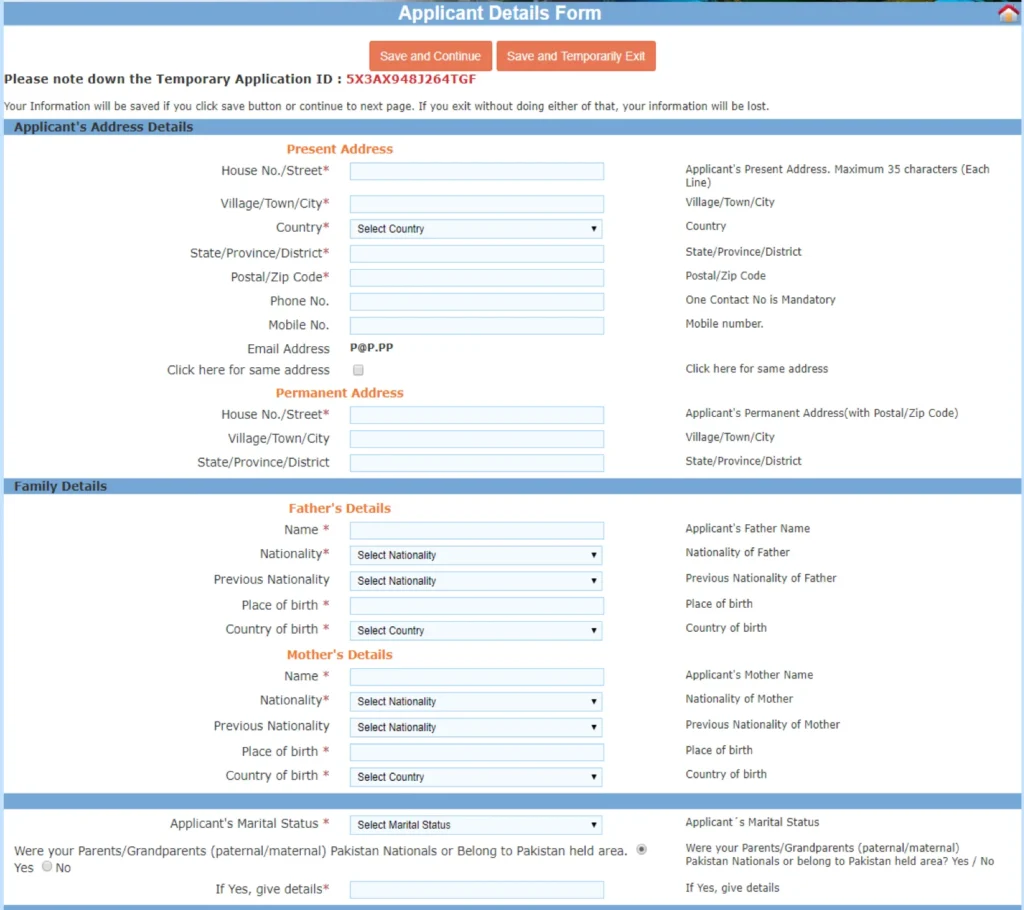
If you don’t know one of your parents’ details or they don’t apply to your situation, you can enter “Unknown” or “NA – Not Available” instead of leaving the field blank.
Step 4: Visa Details and Previous Visits
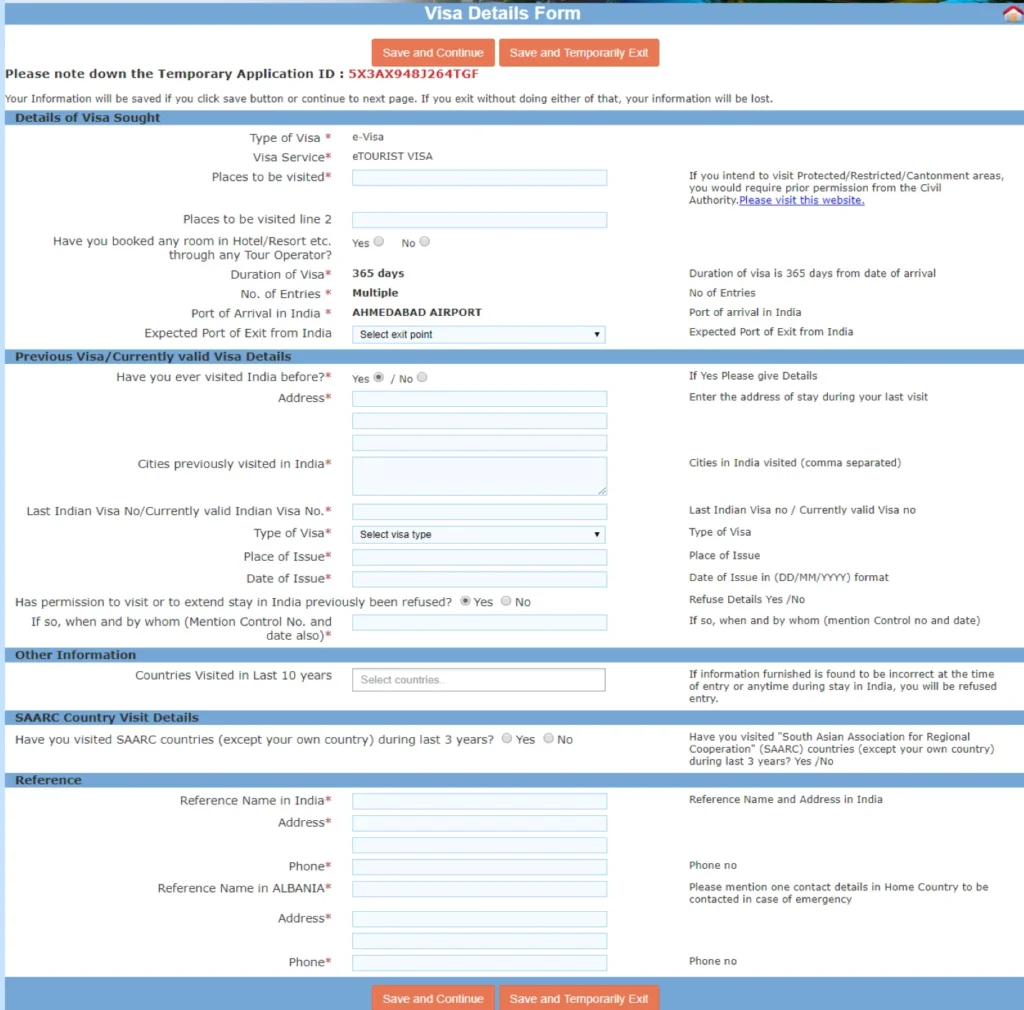
This is probably one of the more time-consuming sections of the application. You’ll enter details about your planned trip to India, as well as information about any previous Indian visa you may have had.
You’ll also need to list all countries you’ve visited in the last 10 years, so have your passport handy and use your stamps and travel records to make sure you don’t leave anything out. The form also asks specifically about SAARC countries (Afghanistan, Bangladesh, Bhutan, India, Maldives, Nepal, Pakistan, and Sri Lanka) you’ve visited in the last 3 years.
Finally, you’ll provide two references: one in India and one in your home country. If you don’t know anyone in India, you can use the address and contact details of your first hotel or accommodation instead.
💡 Tip: If you’ve traveled a lot, don’t underestimate this section. I found it much easier to complete with my passport and travel history right next to me.
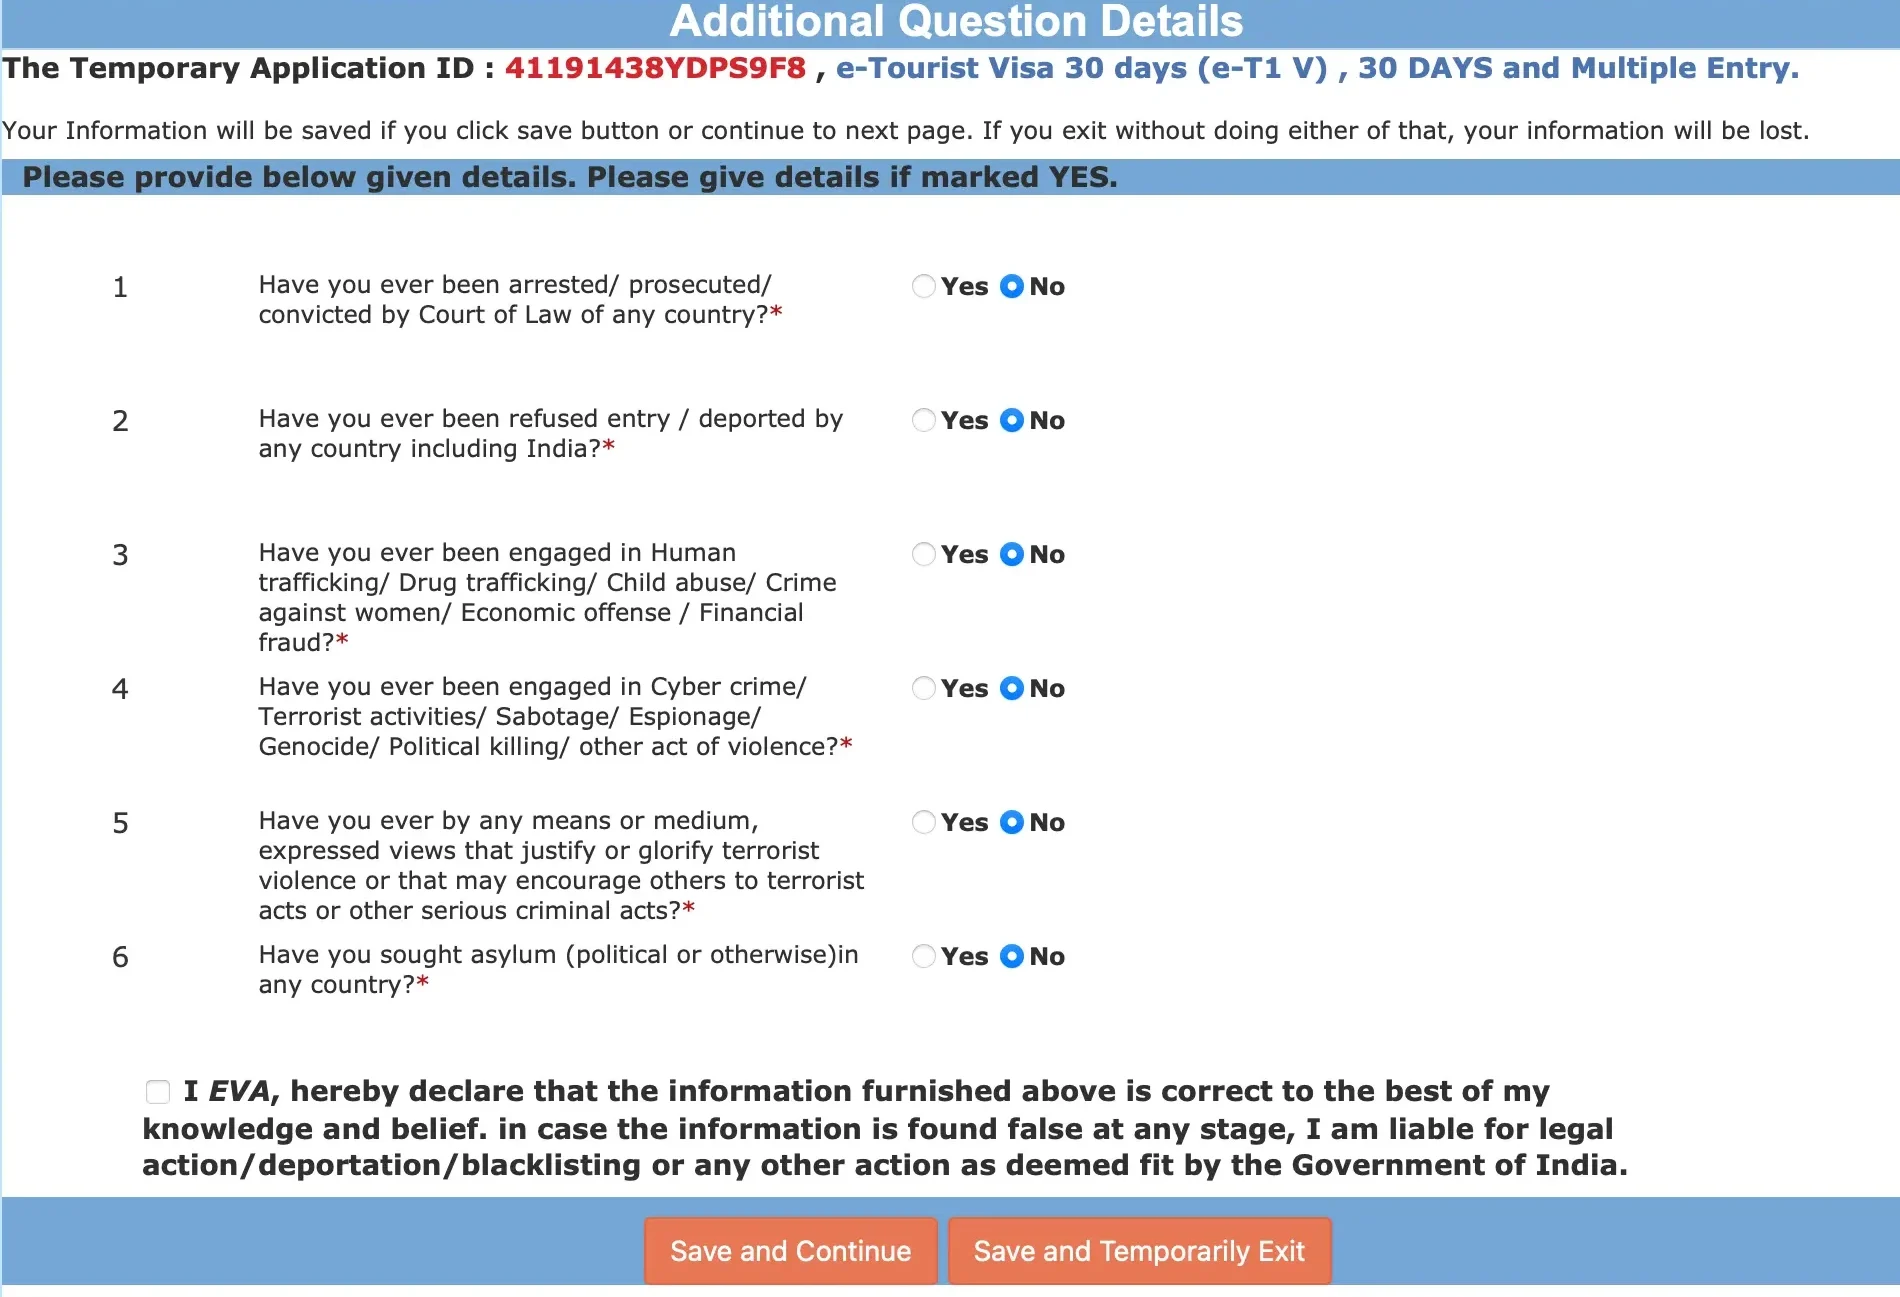
Step 5: Additional questions
For me, this was basically a very satisfying collection of “No” answers. 😂
Of course, answer every question truthfully according to your own circumstances.
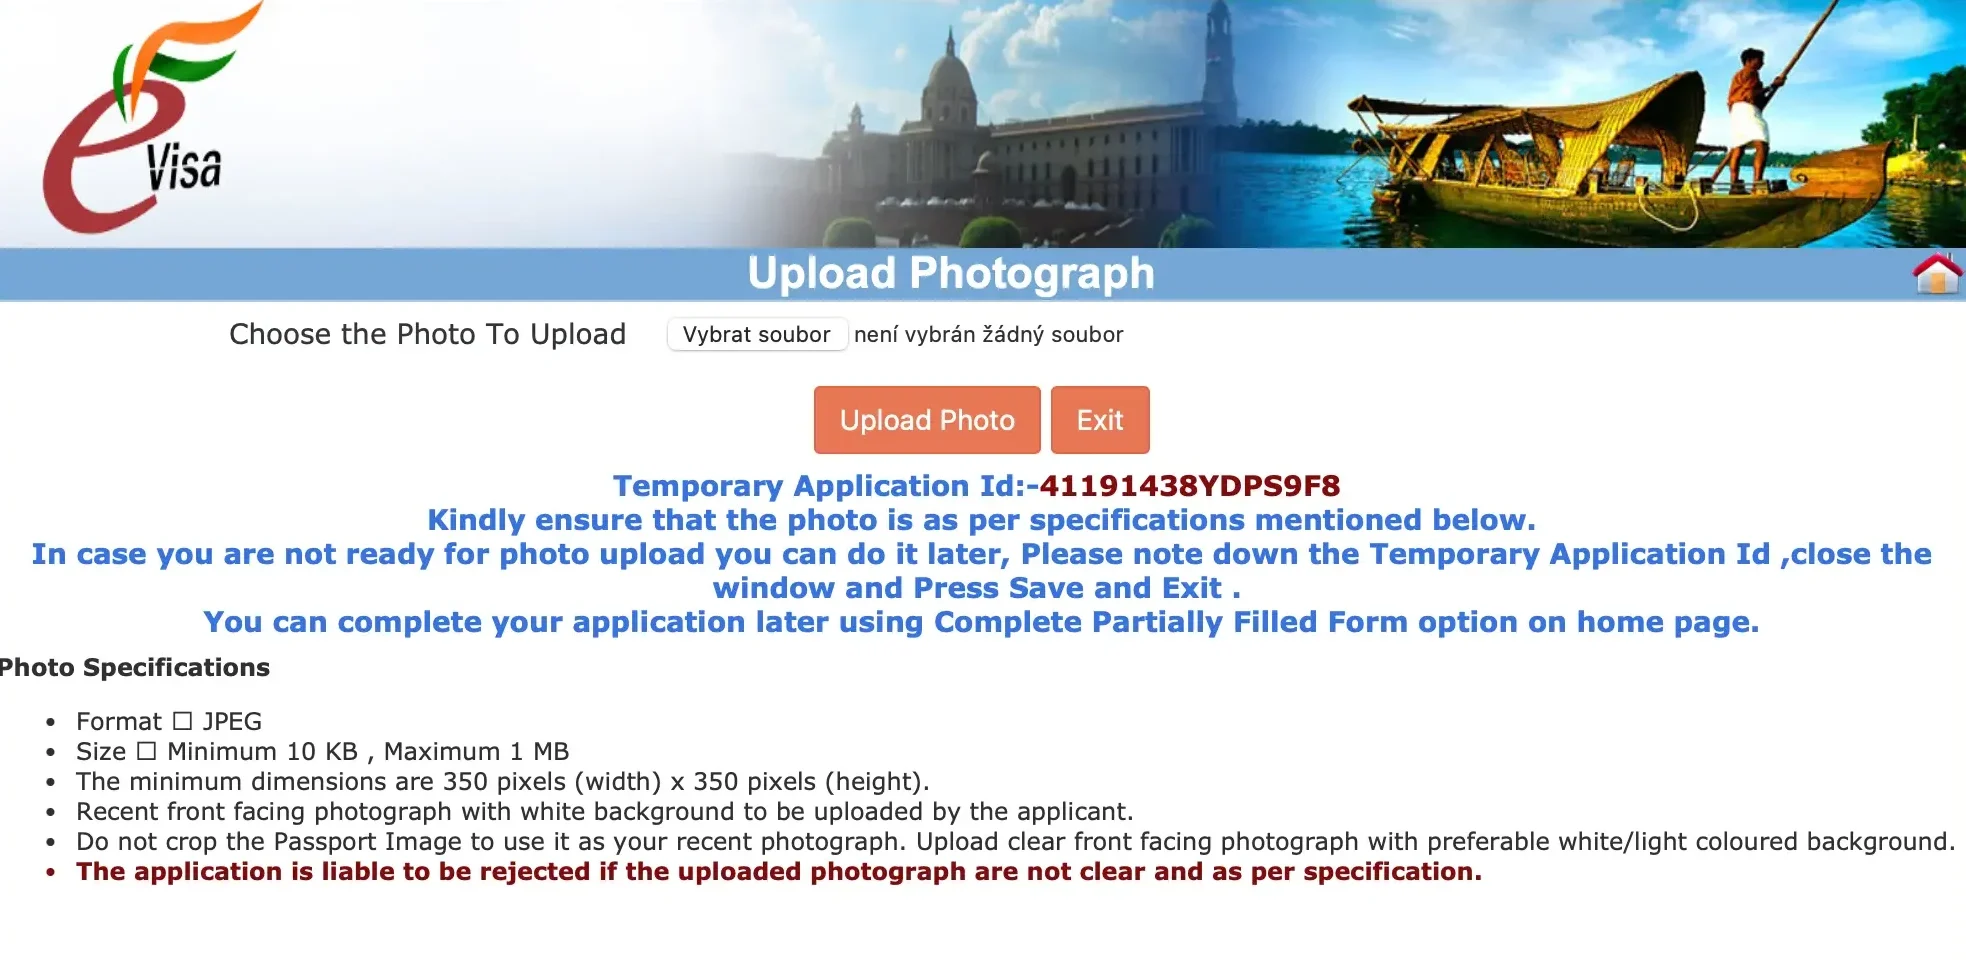
Step 6: Upload Your Photo and Passport
Next, you’ll upload your passport-style photo and a copy of your passport’s bio page.
For the passport, you’ll need a PDF copy of the bio page between 10 and 300 KB. If your scan is larger, you’ll probably need to compress it before uploading. Make sure the entire passport page is clear and readable.
The photo has specific requirements for format, size and appearance, so check them carefully before uploading.
Step 7: Review Everything Carefully
Before submitting, you’ll get a chance to review all the information you’ve entered.
Don’t rush this step. Go through your passport details, personal information and travel details one more time. Catching a typo here is much easier than dealing with a problem after submission. The official Indian visa instructions state that once the eVisa application has been submitted, modifications are not allowed.
Step 8: Pay the India eVisa Fee
Once you’ve reviewed your application, you’ll move on to the payment page.
The eVisa portal offers several payment options, including SBI ePay, PayPal and Axis Bank, with card payments available through the relevant gateways.
There isn’t one payment method that works for everyone. From my own experience, payment can be one of the most frustrating parts of the application. If one gateway doesn’t work, trying another one may be worth it.
If you’re paying by card, make sure your card is enabled for international online payments and can complete any required 3D Secure/OTP verification. The official eVisa site confirms that international Visa and Mastercard cards are supported.
And this is important: if your card is charged but the website shows an error or doesn’t confirm the payment, don’t immediately try to pay again. Check your payment status first. The official website advises waiting 2 hours and checking the transaction status before making another attempt, as a delayed or timed-out transaction can sometimes still be processed.
Personally, this was the part I was most nervous about after the website had already crashed approximately 150 times. 😂 I really didn’t want to discover later that I’d been charged twice.
Payment fees: Expect an additional 3% charge when paying by credit/debit card or 4% when paying through PayPal, on top of the eVisa fee.
How Long Does the India eVisa Take?
The official website allows eligible travelers to apply at least 4 days before arrival, with applications generally available up to 120 days in advance.
However, I would not recommend waiting that long. Websites can crash, payments can fail and documents can be rejected — and I learned that the hard way. 😂
My advice: apply at least a couple of weeks before your trip if possible.
How Do You Know Your India eVisa Was Approved?
Once your application has been processed, you’ll receive your Electronic Travel Authorization (ETA) by email.
You should also check your application status on the official website.
Do not simply assume that your visa is approved because you submitted the form.
Before traveling, make sure your ETA status shows “GRANTED.”
I recommend saving the ETA to your phone and keeping a printed copy with your passport.
Yes, I know we’re living in 2026 and everything is digital.
But when you’re standing at an immigration desk after a long flight to India, having a paper copy is one less thing to worry about.
India eVisa Guide: My 6 Tips for the Application
After surviving my own application — including what felt like approximately 150 website crashes — here are the things I would do differently next time:
1. Prepare everything before opening the website
Have your passport, photo, accommodation details and travel information ready.
2. Don’t rush the form
There are a LOT of questions.
Put on some music, grab a snack and accept that this is going to take a little while.
3. Save your application details
Keep your application ID and confirmation emails somewhere safe.
4. Don’t use unofficial visa websites
The official Government of India website explicitly warns against intermediaries claiming to offer faster or express eVisas.
5. Don’t apply at the last possible moment
Even though the official minimum can be as little as four days before arrival for eligible applicants, I wouldn’t test that limit.
6. Screenshot everything
Especially your application ID, payment confirmation and final ETA.
Future You will be grateful.
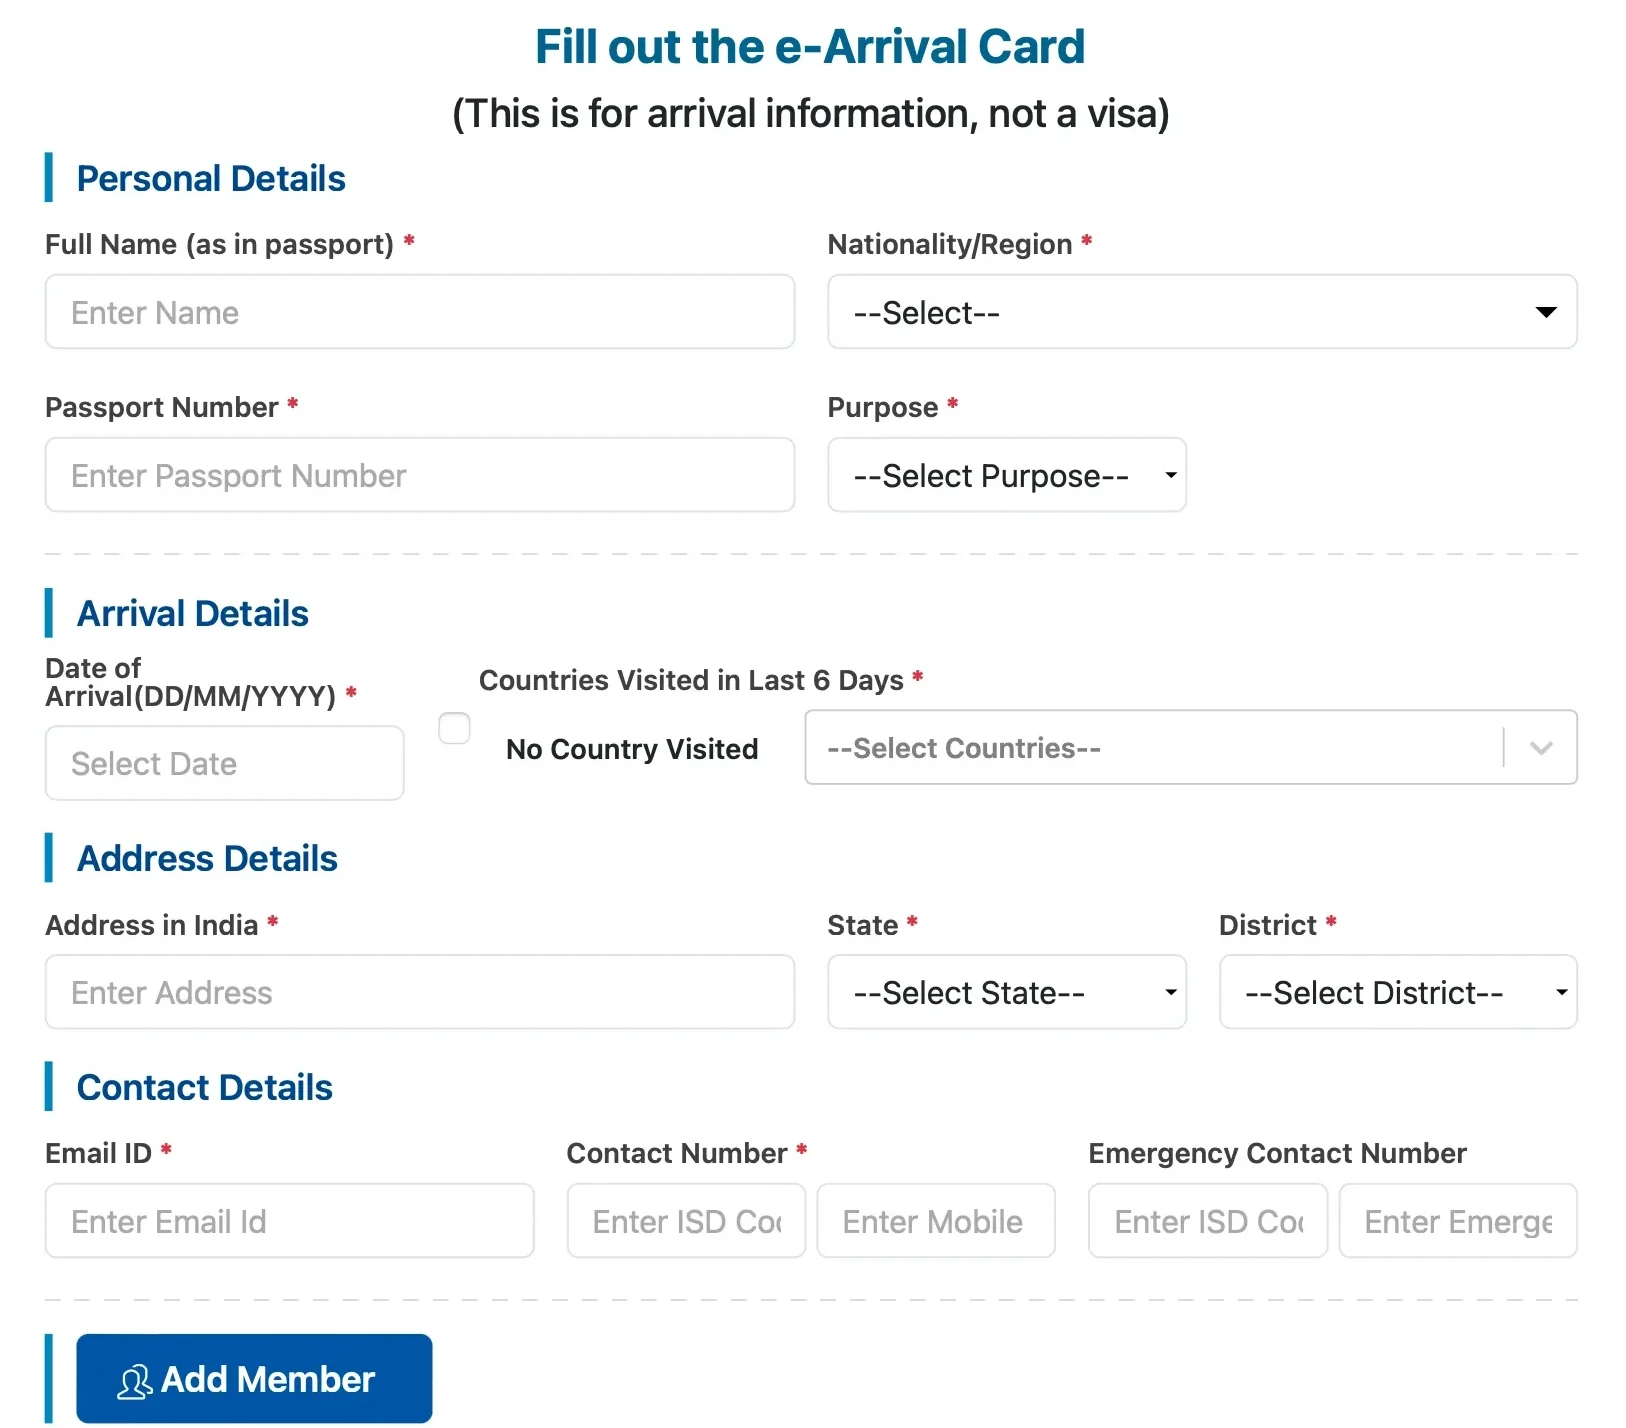
Don’t Forget the India e-Arrival Card
When I traveled to India, I was actually handed a paper arrival card on the plane, which I filled out before landing. The process is now digital, so don’t rely on receiving a paper form on your flight.
Foreign travelers must complete the India e-Arrival Card online within 72 hours before arriving in India. It is free and is not a visa — it’s simply the digital version of the arrival/disembarkation card.
You’ll be asked for information such as your passport details, arrival date, purpose of travel, address in India and contact information.
You can complete it through the official Indian Visa Online e-Arrival Card portal, the Bureau of Immigration website or the official Indian Visa Su-Swagatam app.
India Travel Essentials I Recommend
Once your visa is sorted, don’t forget a few other essentials before your trip:
🎟️ Tours & experiences: Browse and pre-book activities on GetYourGuide.
📱 eSIM: Get mobile data before you land. I use Saily for travel eSIMs — use code EVIE5 for $5 off.
🛡️ Travel insurance: Don’t skip it, especially for a longer trip. SafetyWing is one option worth checking.
🏨 Accommodation: If you’re arriving late at night, I recommend booking your first night in advance. Compare hotels on Booking.com
India eVisa Guide: Frequently Asked Questions
How far in advance should I apply for an India eVisa?
You can apply for an India eVisa in advance of your trip, but the exact application window depends on the type of eVisa. While eligible travelers may be able to apply as little as 4 days before arrival, I recommend applying well ahead of your trip in case there are any issues with your application or payment.
How long does an India eVisa take to be approved?
Processing times can vary, so I wouldn’t leave your application until the last minute. Even though the official minimum can be as little as 4 days before arrival for eligible travelers, I recommend applying at least a couple of weeks before your trip whenever possible.
Can I apply for an India eVisa myself?
Yes. You can complete the application yourself through the official Government of India eVisa website. You don’t need to use a visa agency or third-party website. In this India eVisa guide, I walk you through the application step by step so you can see what to expect before you start.
How much does an India eVisa cost?
The cost depends on your nationality and the type of eVisa you apply for. Fees can change, so always check the current fee shown on the official Indian eVisa website before submitting your application.
Do I need to print my India eVisa?
I recommend printing your approved Electronic Travel Authorization (ETA) and carrying it with your passport, even though the approval is electronic. I also keep a digital copy on my phone as a backup.
Final Thoughts: Is the India eVisa Application Difficult?
Honestly?
Not really. It’s just unnecessarily stressful.
The actual information isn’t particularly complicated, but the application is long, the questions can feel random and the website… well, let’s just say my relationship with it wasn’t exactly healthy. 😂
The good news is that you don’t need an agent. You can complete the application yourself online, and once you’ve got your approved ETA, one of the biggest pre-trip tasks is officially done.
I hope this India eVisa guide makes the process a little less intimidating for you.
If you’re planning your first trip to India, I’d recommend getting the visa sorted early, saving all your confirmation documents and then moving on to the much more exciting part:
planning what you’re actually going to do once you get there.
Check Out My Other India Travel Guides
→ Read my complete 2 Weeks in India Itinerary for first time travelers
→ Is India Safe For Solo Female Travelers? (2026 Guide)
→ Where to stay in Delhi: Best Areas & Hotels for Every Budget
→ Best Time to Visit India: When to Go & What to Expect
→ Check my Ultimate India Packing List: What to Pack & Wear in India (Female Traveler Guide)
Check Out My Delhi Guides
- Where to Stay in Delhi: Best Areas for First-Time Visitors
- Best Things to Do in Delhi: 12 Places You Shouldn’t Miss
- My Perfect 3 Days in Delhi Itinerary: The Ultimate First-Time Guide (2026)